
Inventory Management: track stock with inventory items
GoTab Inventory Management tracks stock on inventory items that you link to products and options, so one item can feed many products and pour sizes can deplete by the ounce. This article covers setup, options and conversion factors, variants, adjustment reasons, reporting, and what is still on the way.
Inventory Management is how GoTab tracks stock. Instead of a count living inside each product, as in Legacy Product Inventory, stock lives on inventory items. You link products and options to an item, and every sale depletes it.
This means you can:
- Share stock across products. A House Burger, a Double Burger, and a Kids Burger can all draw from one “Burger Patty” item.
- Deplete by the ounce, gram, or bottle. A 16 oz pint and a 4 oz taster can both pull from one beer item.
- Track things you don’t sell on their own, like fries, dough, or a side, by linking them to options.
- See ingredient counts on the KDS (where enabled).
Key terms
Section titled “Key terms”| Term | What it means |
|---|---|
| Inventory item (also called a SKU) | The thing that holds a count, such as “Burger Patty” or “Community IPA”. |
| Linking | Connecting a product or option to an inventory item so that selling it depletes the item. |
| Unit Conversion (on a product) | How many units of the linked item one sale of the product uses. Default is 1. |
| Conversion Factor (on an option) | How many units of an item one selection of that option uses. Default is 1. |
| Units | The label for how you count an item (count, oz, ml, lb). The label doesn’t change the math. The Unit Conversion and Conversion Factor numbers do. |
Create an inventory item
Section titled “Create an inventory item”You can create items from the product or from the Stock Levels page. Each item’s SKU is permanent once saved, so choose something readable, such as the product name or burger-patty. You can change the item’s name and units at any time.
From the product
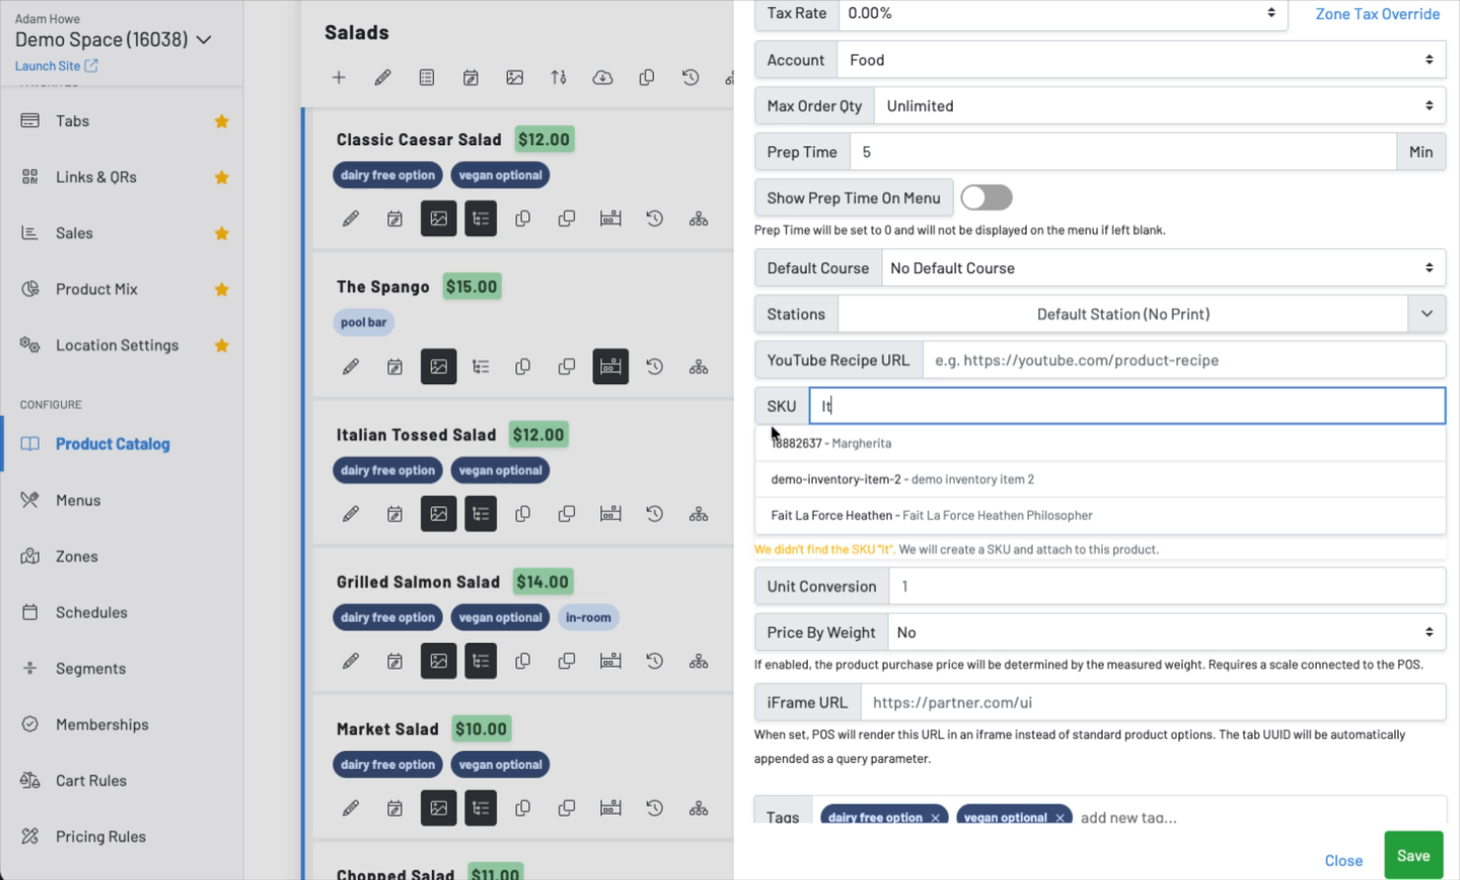
Section titled “From the product”- Open the product in Product Catalog and find the SKU field.
- Start typing. GoTab searches your existing items and shows any match.
- Pick an existing item to link it, or keep typing a new SKU. If nothing matches, GoTab shows “We didn’t find the SKU… We will create a SKU and attach to this product.”
- Click Save. The item is created and linked.
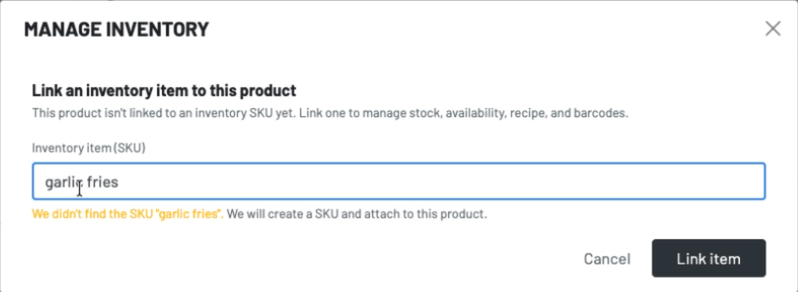
You can also click the product’s Stock Levels icon. If the icon is highlighted, the product is already linked. If it isn’t highlighted, you’ll see Link an inventory item to this product. Type to search for an existing item, or type a new SKU, then click Link item.
From the Stock Levels page
Section titled “From the Stock Levels page”- Go to Stock Levels in the left menu.
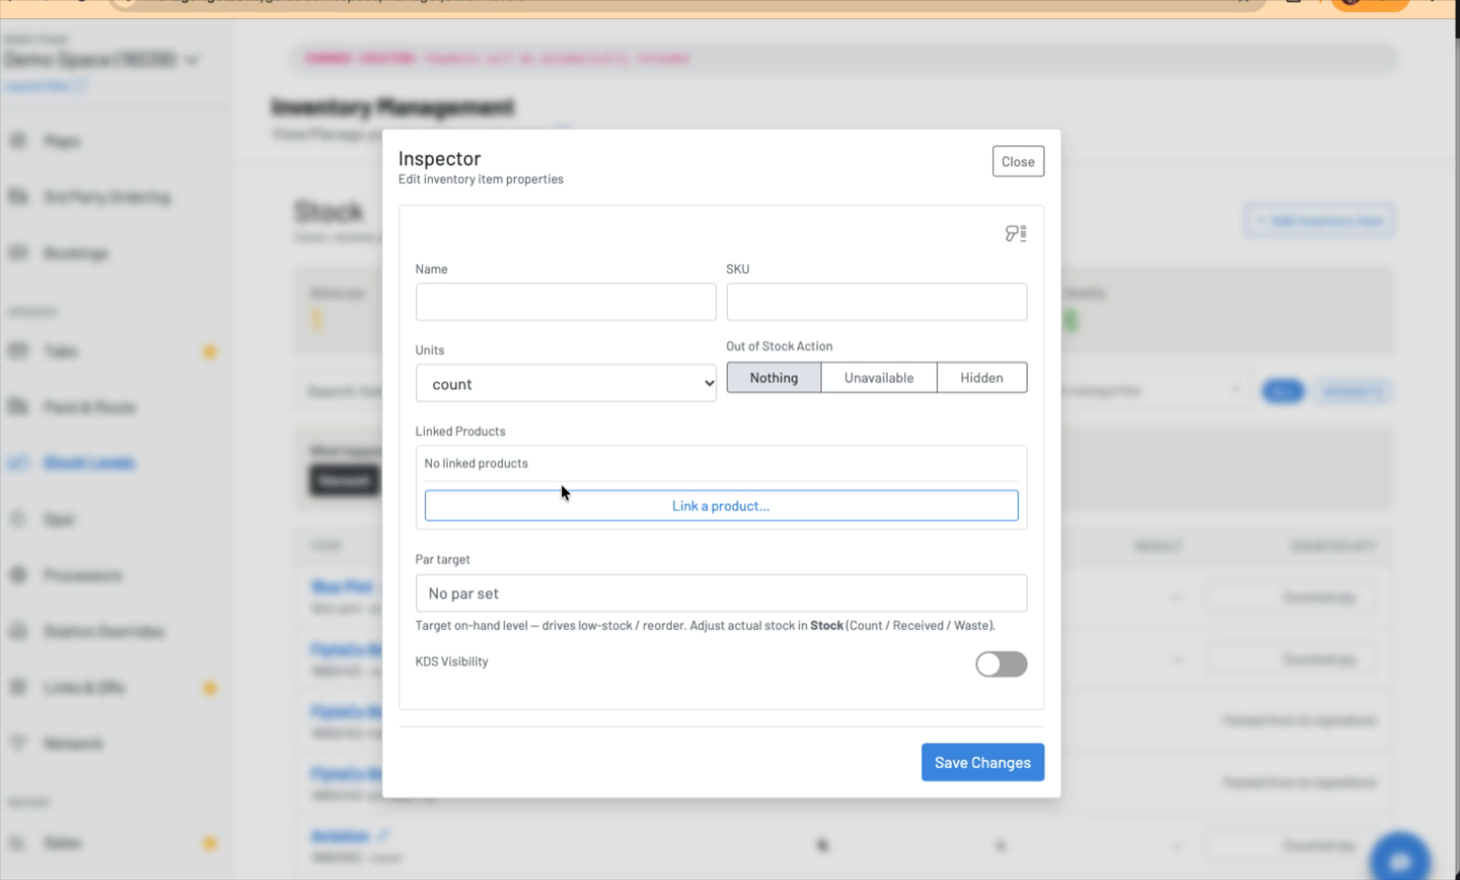
- Click + Add inventory item.
- Enter a Name and a SKU.
- The SKU is required. Without it, the item doesn’t save.
- The SKU must be unique at your location. Letters and numbers both work, such as
GarlicFriesor1042.
- Choose Units and an Out of Stock Action, and optionally set a Par target.
- Click Save Changes.
You don’t have to link the item yet. Creating items ahead of time and linking them later from the product is fine.
On the POS
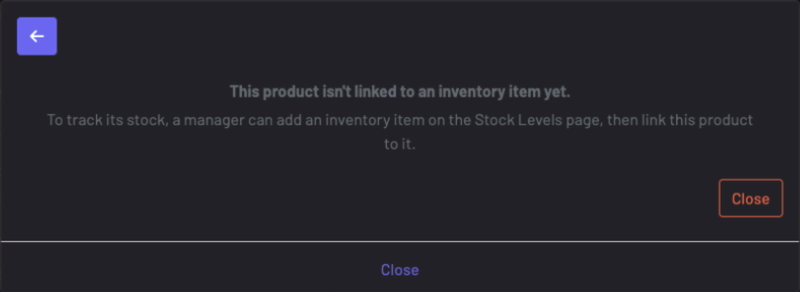
Section titled “On the POS”You can’t link or create items from the POS. If you long-press a product that isn’t linked and choose Adjust Stock, the POS explains that a manager needs to link it first. Link it from the Stock Levels page or the product, then adjust stock from the POS as usual.
Set up an inventory item
Section titled “Set up an inventory item”On Stock Levels, click the pencil next to an item to open the Inspector.
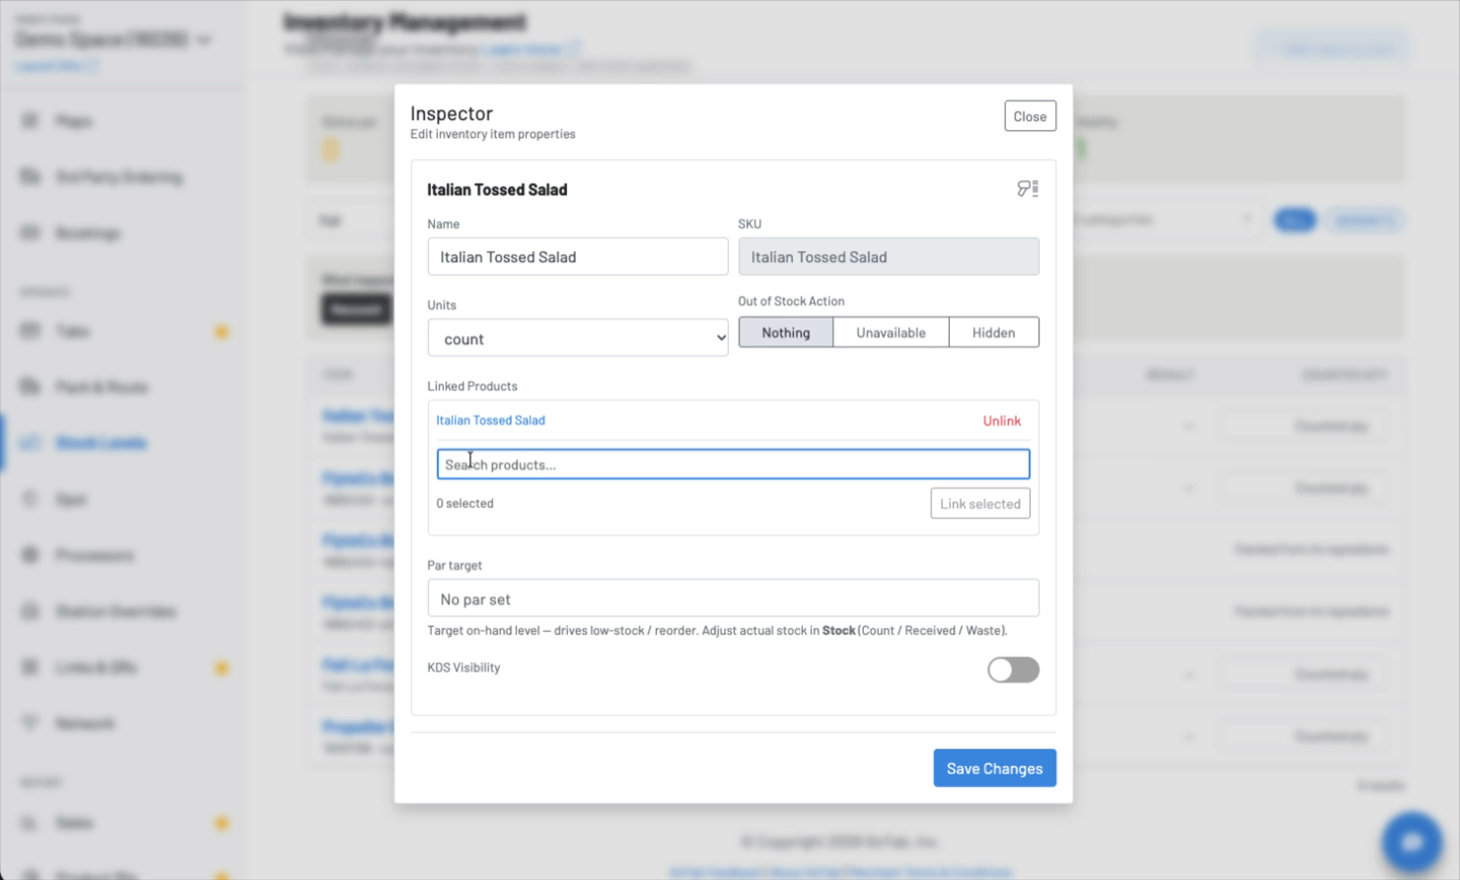
| Field | What it does |
|---|---|
| Name | The display name. You can change it any time. |
| SKU | Locked once created. |
| Units | count, oz, ml, lb, and so on. |
| Out of Stock Action | What happens to linked products when the count reaches zero. See below. |
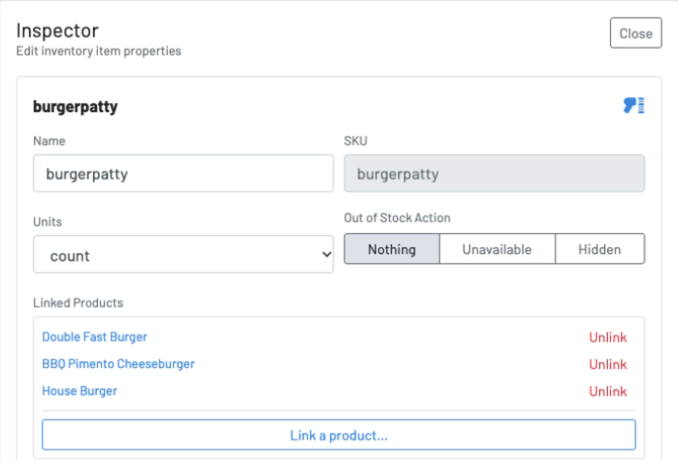
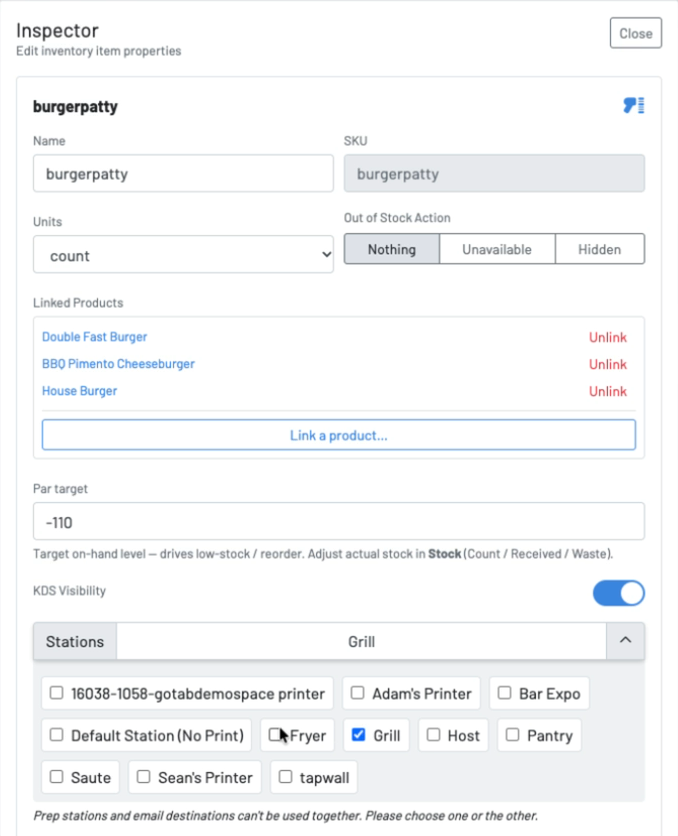
| Linked Products | Products that deplete this item. Use Link a product… to add more, or Unlink to remove one. |
| Par target | The on-hand level you want to keep. It drives the Below par filter. |
| KDS Visibility | Shows this item’s count on the KDS Break Down view, where it’s available. |
Out of Stock Action
Section titled “Out of Stock Action”| Setting | When the item reaches zero |
|---|---|
| Nothing | Keeps counting. Products stay available. Use this when you only want to track usage. |
| Unavailable | Every linked product is marked unavailable (86’d) for the rest of the business day. Best for items you’ll restock soon. |
| Hidden | Every linked product is hidden from menus until you turn it back on. Best for limited specials. |
Because an item can feed several products, an Out of Stock Action on a shared item such as “Burger Patty” affects every burger linked to it. The item’s Linked Products list shows everything it feeds.
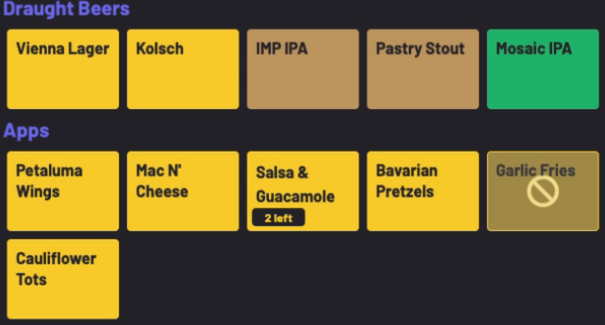
On the POS, a product that’s out of stock or marked unavailable shows a crossed-out icon on its button.
When you restock with Recount or Received, products that were made unavailable or hidden don’t switch back on automatically. Turn them back on from the Product Catalog, the POS, or KDS Expo.
How much each sale uses: Unit Conversion
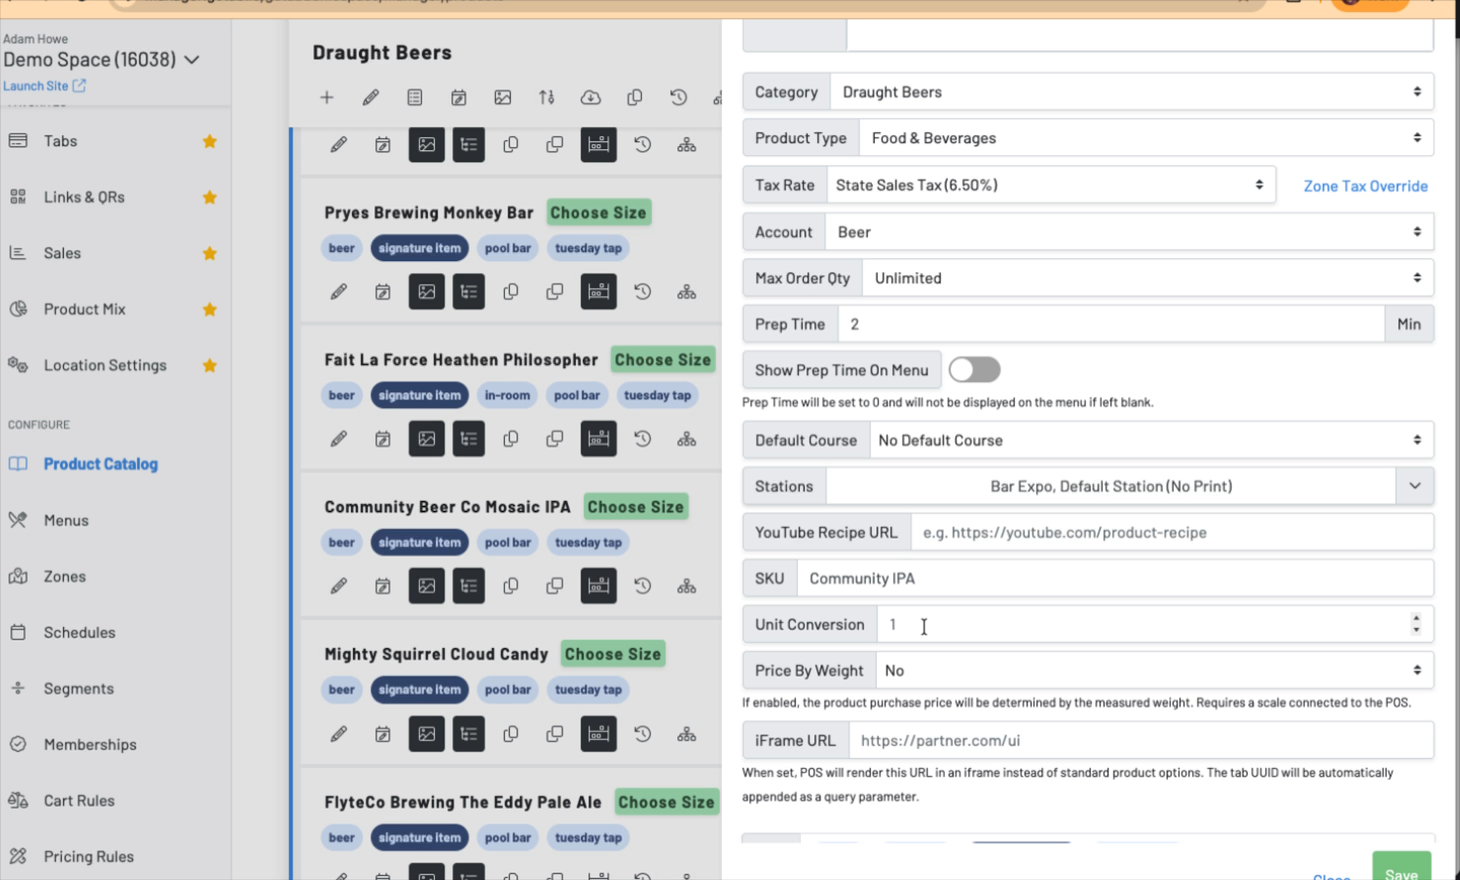
Section titled “How much each sale uses: Unit Conversion”On the product’s edit form, Unit Conversion sets how many units of the linked item one sale uses. For example, link both a lunch and a dinner Italian salad to one “Italian Tossed Salad” item. Set the lunch salad to 1 and the dinner salad to 2.
Count and adjust stock
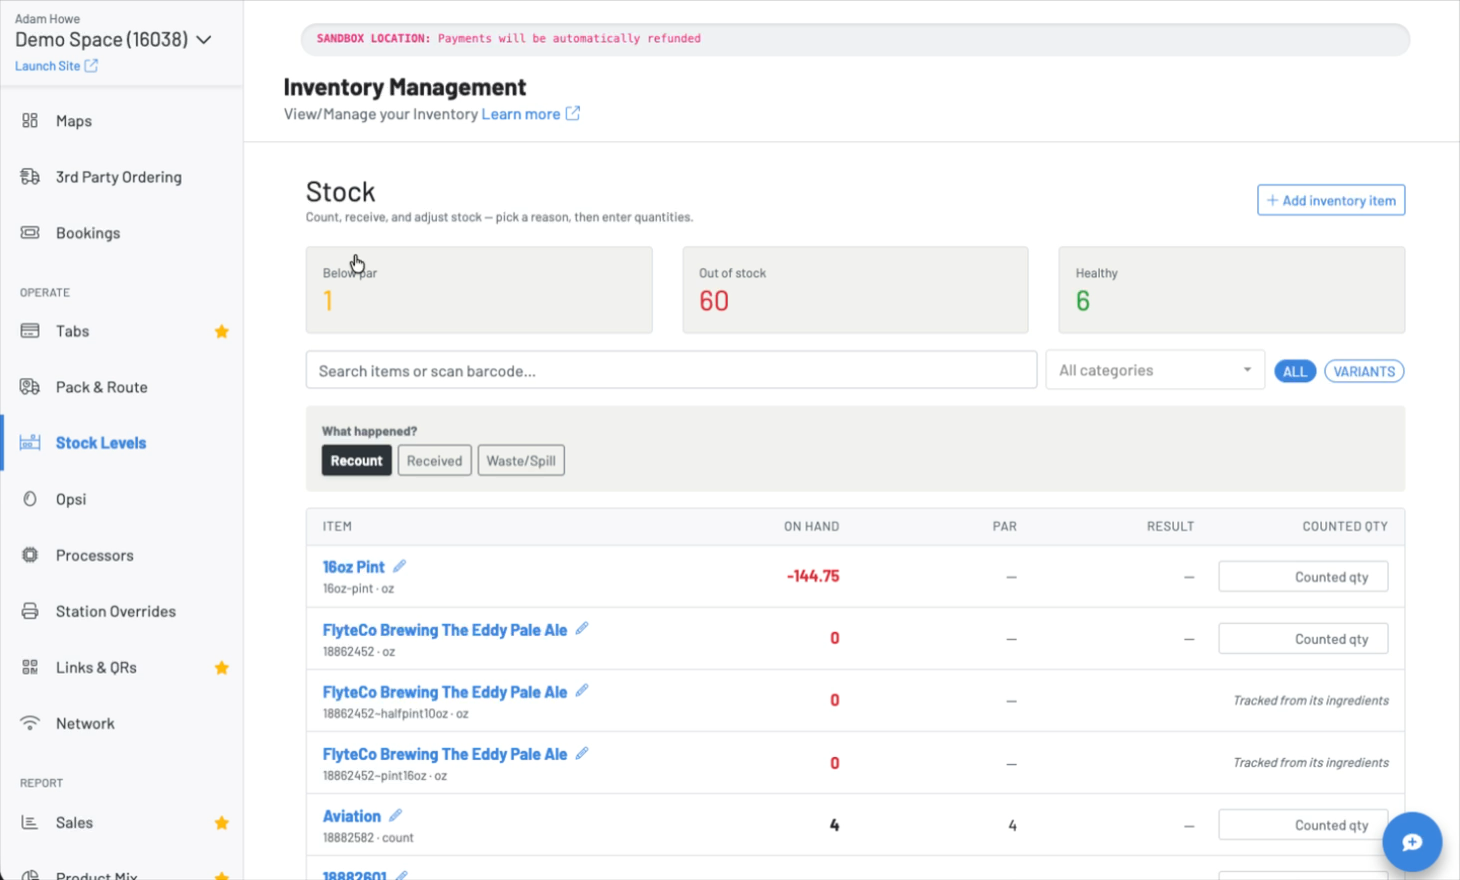
Section titled “Count and adjust stock”On Stock Levels, choose what happened under What happened?, then enter quantities:
- Recount replaces the on-hand count with the number you enter.
- Received adds the number you enter to on-hand.
- Custom reasons that you create (for example Waste/Spill or Theft) set, add to, or remove from on-hand, depending on how you configured them.
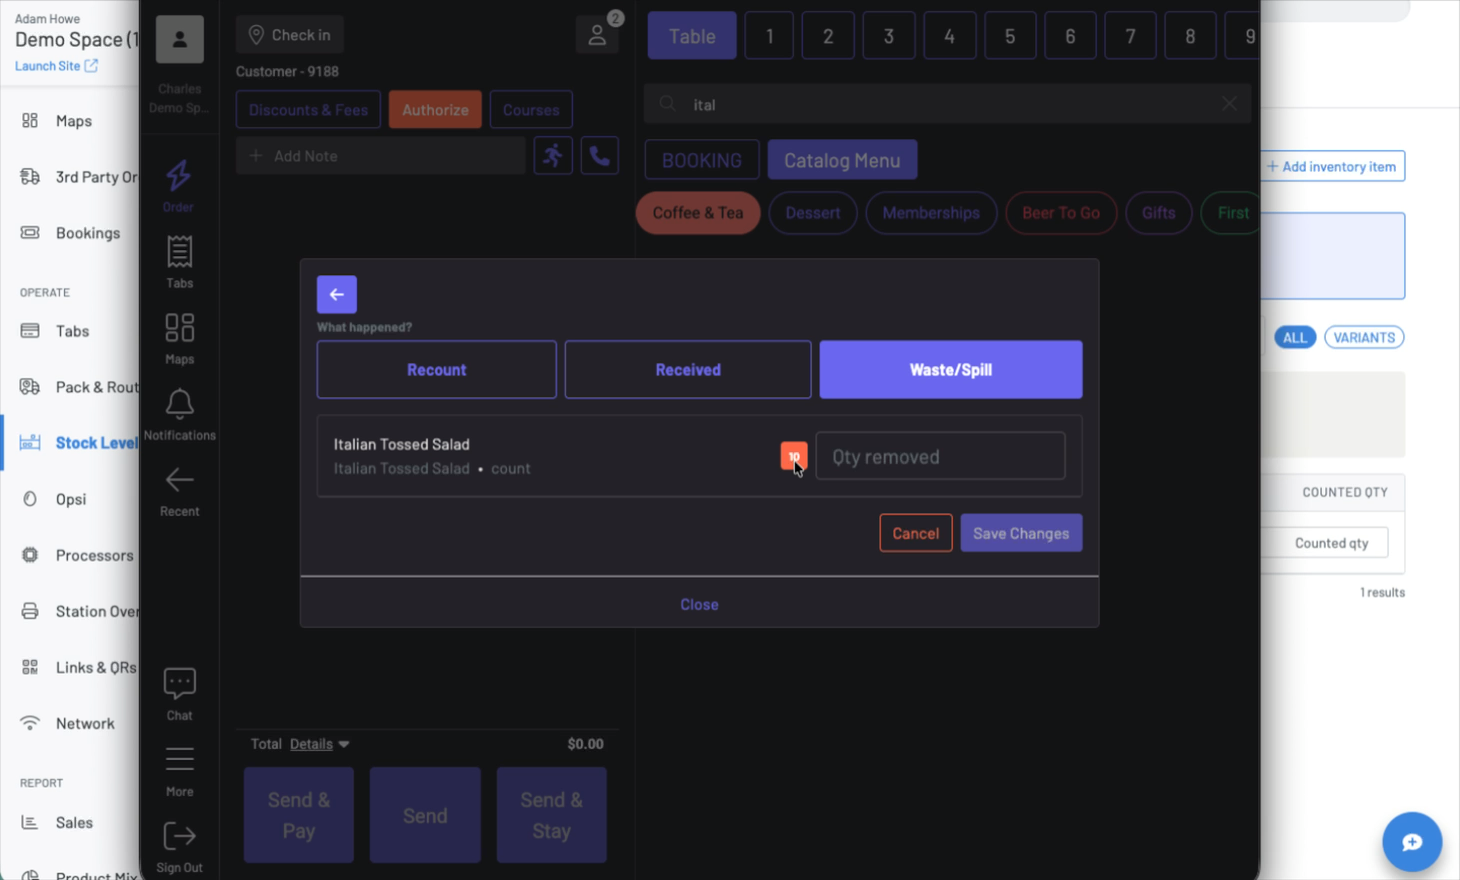
Only Recount and Received exist by default. To track waste, spills, or theft, create those reasons first (see Create custom adjustment reasons).
The tiles at the top filter the list to Below par, Out of stock, or Healthy items. The search bar accepts names, SKUs, or a scanned barcode.
You can also adjust stock from the POS (long-press a product, then Adjust Stock) and from the KDS. A quick count at the start of each shift keeps availability accurate all day.
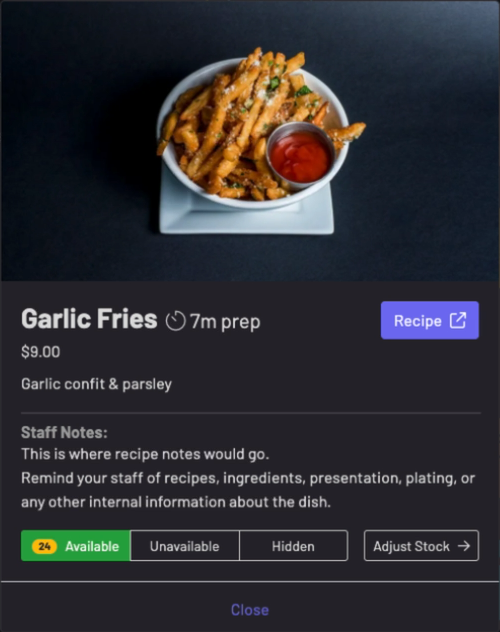
When a linked item has an Out of Stock Action of Unavailable or Hidden, long-pressing the product on the POS shows how many are available, as a badge on the Available button.
If the Saving… spinner keeps spinning after you adjust a count from a product’s Stock Levels window, close the window and check the count. The change is usually saved.
Create custom adjustment reasons
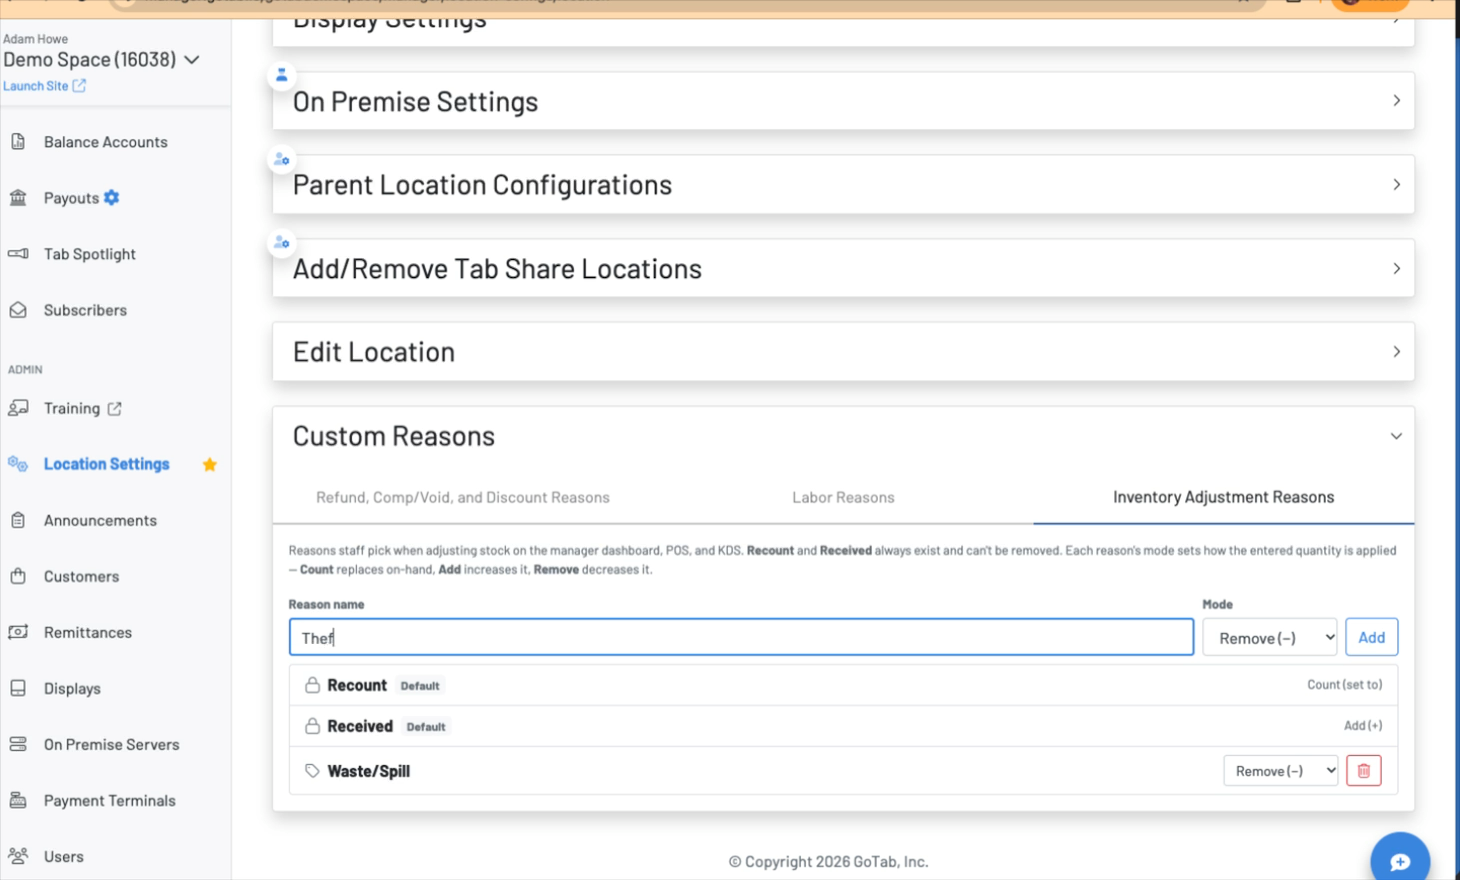
Section titled “Create custom adjustment reasons”- Go to Location Settings → Edit → Custom Reasons → Inventory Adjustment Reasons. You need the Control › Location permission.
- Enter a Reason name and choose a Mode:
- Count (set to) replaces on-hand.
- Add (+) increases on-hand.
- Remove (−) decreases on-hand.
- Click Add.
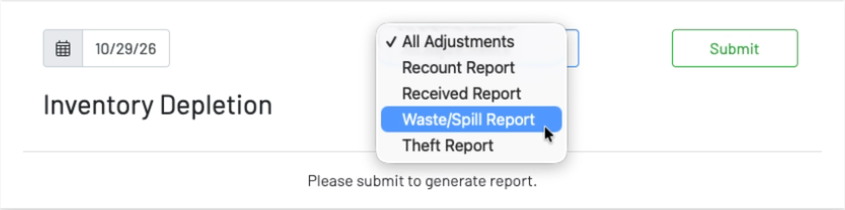
Recount and Received are always available and can’t be removed. Your custom reasons appear everywhere stock is adjusted (the Manager Dashboard, POS, and KDS), and each one gets its own inventory report.
Options: pour sizes, sides, and add-ons
Section titled “Options: pour sizes, sides, and add-ons”Each option has inventory settings under Advanced:
| Field | Use it for |
|---|---|
| SKU (optional) | Link this option to its own inventory item, such as a side of fries. |
| Conversion Factor (default 1) | How many units one selection uses. |
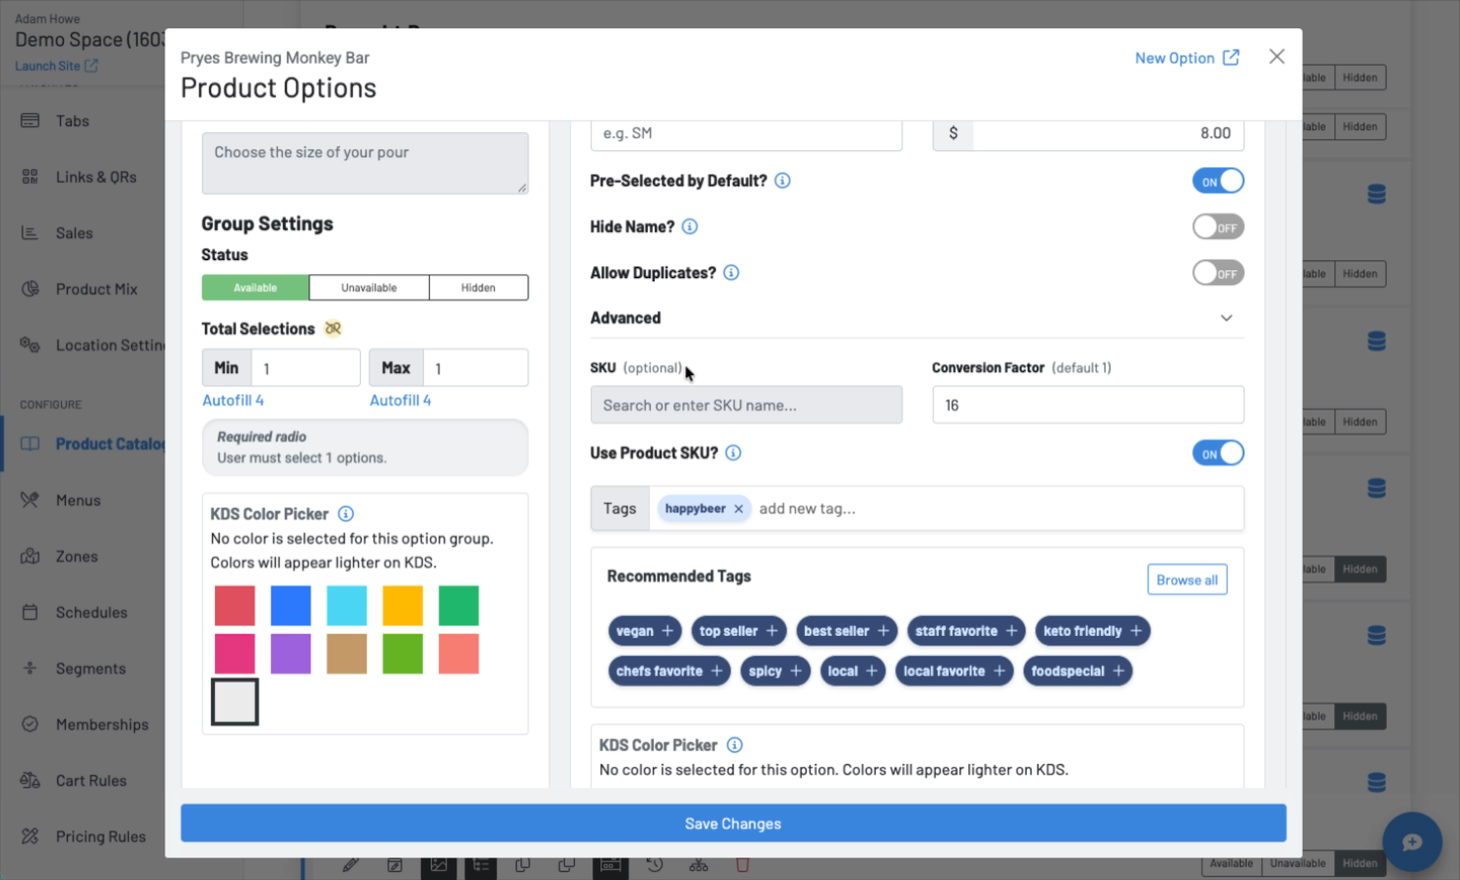
| Use Product SKU? | Use the product’s item instead of a separate one. Use this for pour sizes. |
Beer, wine, and liquor by the ounce
Section titled “Beer, wine, and liquor by the ounce”- Link the product (for example Community IPA) to an inventory item and set that item’s Units to oz.
- Open each pour-size option, then Advanced:
- Turn on Use Product SKU?
- Set Conversion Factor to the ounces poured: 16 for a pint, 4 for a taster, and so on.
- Save, and test with a sale.
When a pour-size option uses the product’s item, the option’s conversion factor sets how much is depleted. A pint takes 16 oz off the item, and a 4 oz taster takes 4 oz.
If the POS, KDS, or receipt shows a unit label next to the quantity (for example “1 oz”), set the product’s Unit Conversion to your standard pour, such as 16. The line then shows a plain quantity. When a pour-size option uses the product’s item, the option’s conversion factor decides how much is depleted, so this change doesn’t affect your counts.
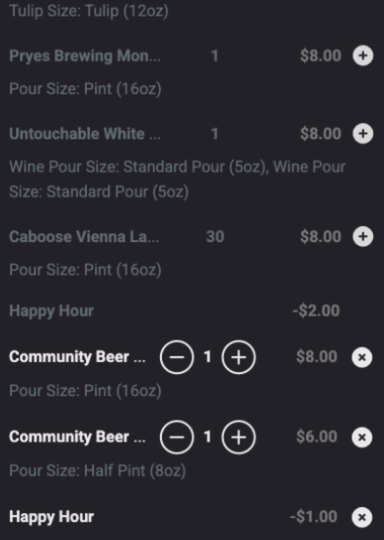
The pour-size buttons beside each beer in this screenshot come from quick modifiers, a separate POS setting.
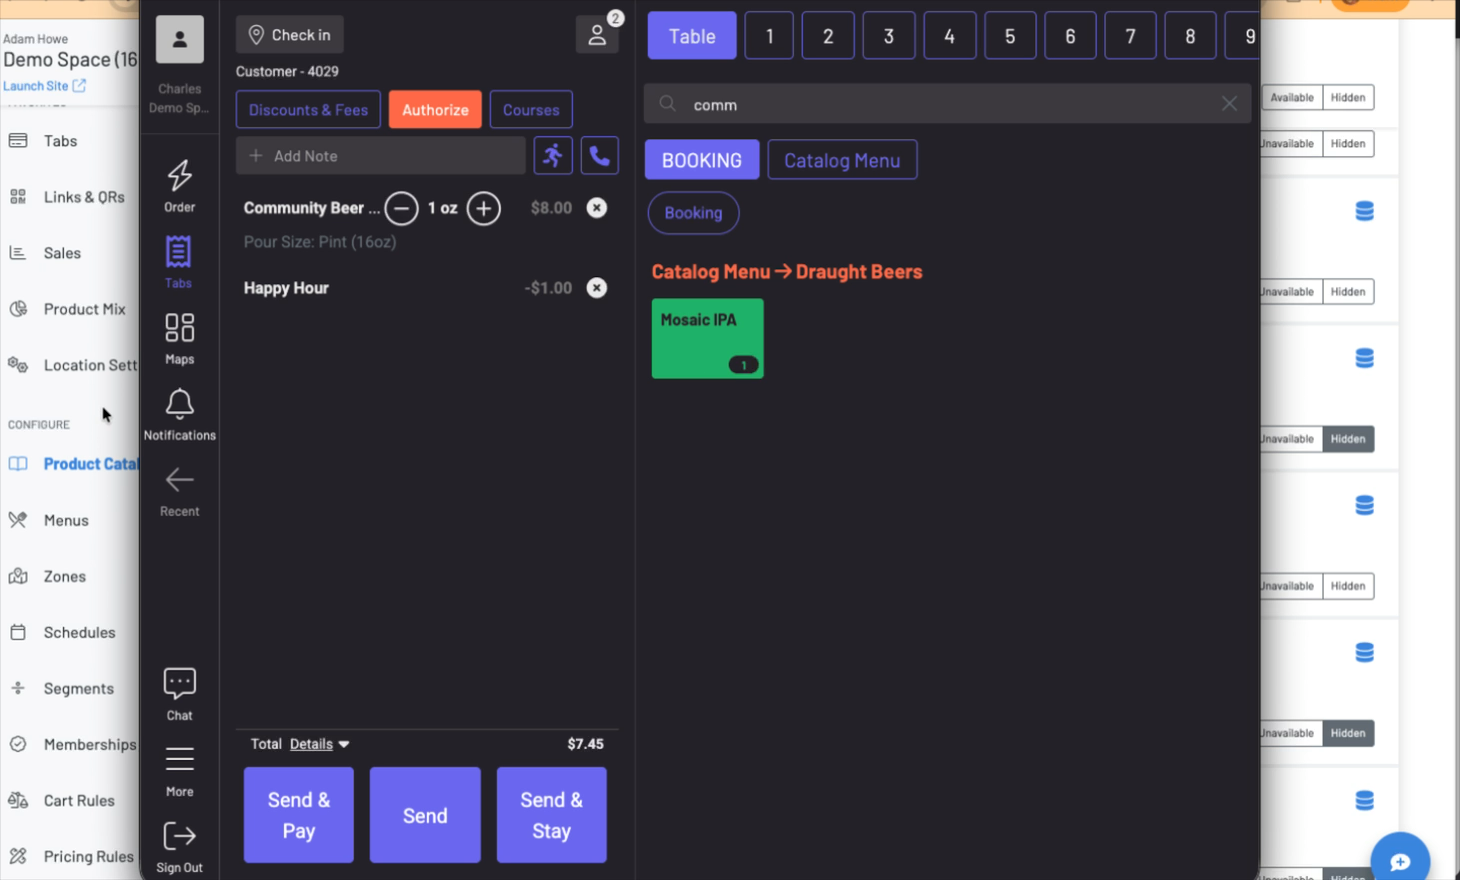
The same approach works for wine. Track the item in ounces or ml, set a glass pour to your standard pour, and set the bottle option to a full bottle (25.4 oz or 750 ml). When there isn’t enough left for a full bottle, the bottle option follows the item’s Out of Stock Action.
Sides and add-ons
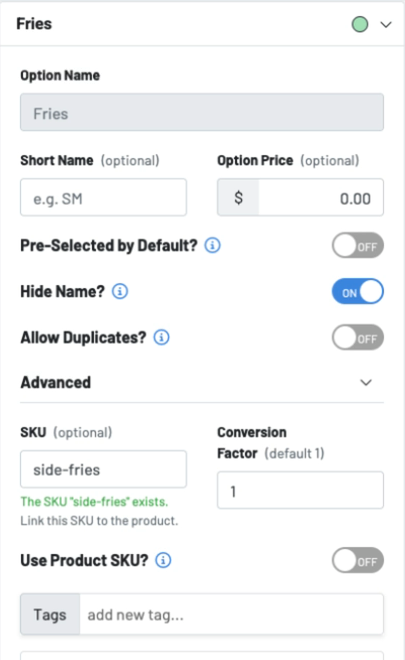
Section titled “Sides and add-ons”Give the option its own SKU, for example a “Fries” option linked to side-fries, and leave Use Product SKU? off. The option depletes its own item in addition to the product’s item.
Leave Conversion Factor blank to use 1, or set it to 2 for a double portion. The conversion factor must be a whole number.
Tracking several ingredients on one product
Section titled “Tracking several ingredients on one product”A product can currently link to one inventory item. To track additional ingredients today:
- Create an option group of the ingredients you care about (lettuce, tomato, bun).
- Link each option to its item.
- Set each option to be pre-selected by default.
Each ingredient then depletes with every sale. If one runs out, only that option becomes unavailable, not the whole product. The trade-off is longer kitchen tickets, because the options print on the ticket.
Coming soon: a recipe builder that links several ingredients directly to one product.
Variants (merchandise)
Section titled “Variants (merchandise)”Use variants when two or more choices together make a distinct item you stock, such as a T-shirt in size × color. If only one thing varies (for example sizes only), a regular option group with an inventory item linked to each option is simpler.
Set up a variant product
Section titled “Set up a variant product”-
Create the product. Set Base Price to 0, because prices are set on each variant, and set Display Price to something like Choose Style. Choose a tax rate and station as usual. Leave the SKU field blank.
-
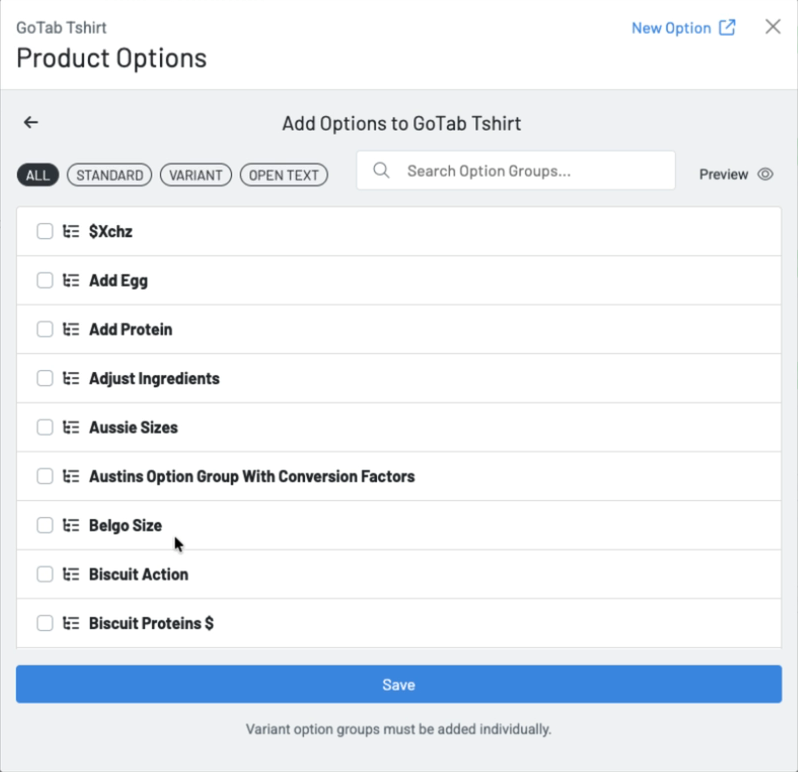
On the product, add an option group, filter by VARIANT, and pick your variant group (for example Shirt). Variant groups are added one at a time.
-
GoTab automatically creates one inventory item for every combination, with SKUs like
19206388~large~blue. The product itself doesn’t get an item.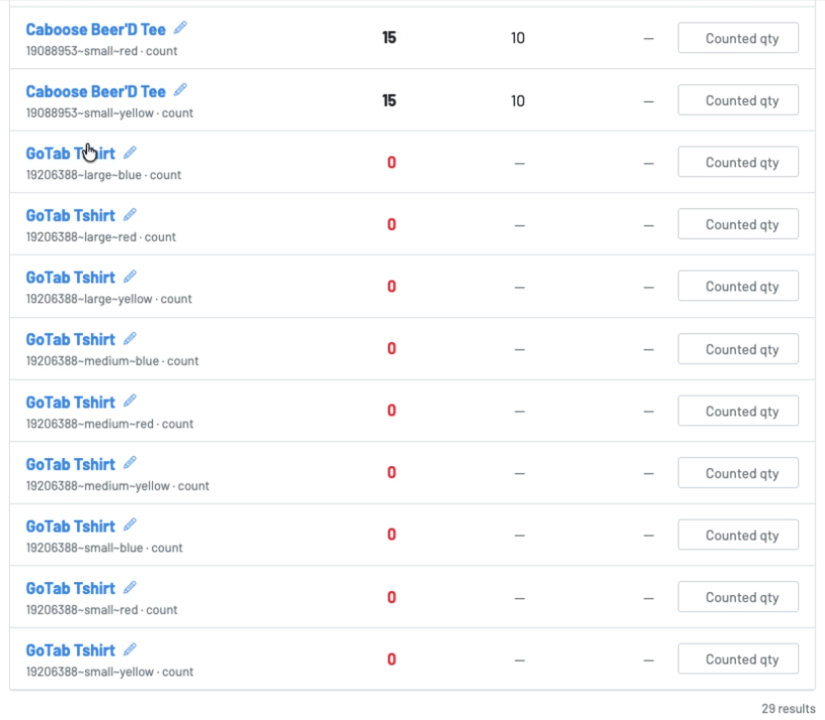
Manage variant stock
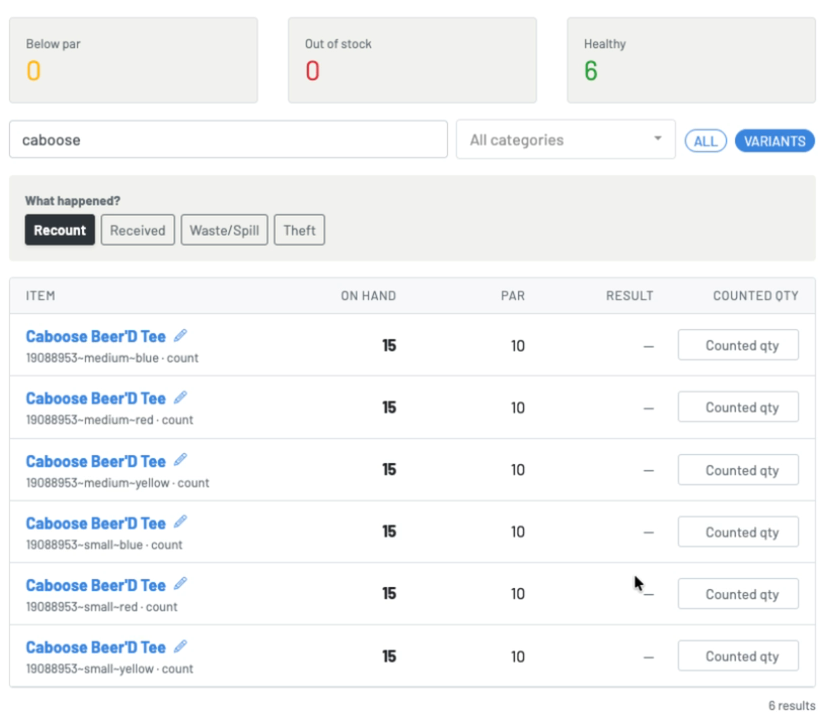
Section titled “Manage variant stock”- Go to Stock Levels and click the Variants filter. The list and the Below par, Out of stock, and Healthy tiles then count only variants.
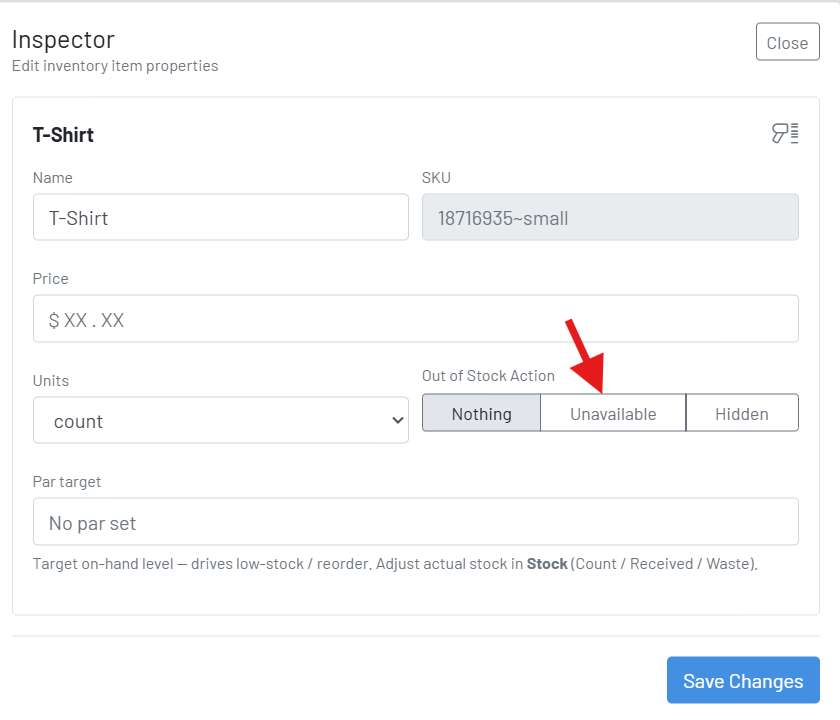
- Click the pencil on each variant to set its Price, Units, Out of Stock Action, and Par target. Set the Out of Stock Action, usually Unavailable, so sold-out sizes can’t be ordered.
- To set counts, choose Recount and type a quantity for every variant in the list, then save once. You don’t have to open each variant.
Things to know about variants:
- Variant SKUs are locked. Each variant tracks its own stock and can’t be linked to other products.
- Renaming a variant option creates a new variant item. The old count and barcodes stay on the old item. Settle option names before you start counting.
- Removing a variant option group clears variant prices. Take a screenshot of your prices before removing one.
- After creating new variants, open each one on Stock Levels and click Save Changes, then test a sale to confirm it depletes. A newly created variant may not start tracking until it’s been saved once from Stock Levels. You’ll usually do this anyway when you set each variant’s price.
Reporting
Section titled “Reporting”Inventory report
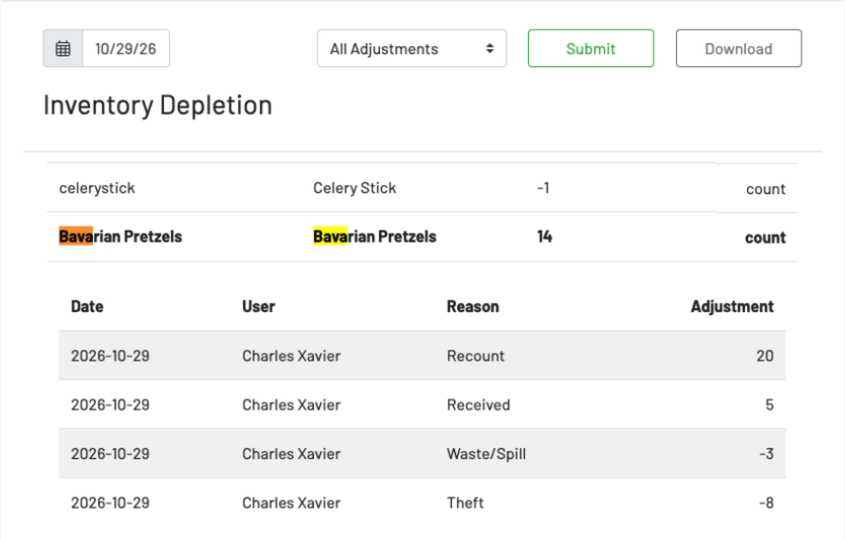
Section titled “Inventory report”Go to Report → Inventory (Inventory Depletion), choose a date or date range and a reason, then click Submit.
- All Adjustments shows every item with its total change and units, including sales.
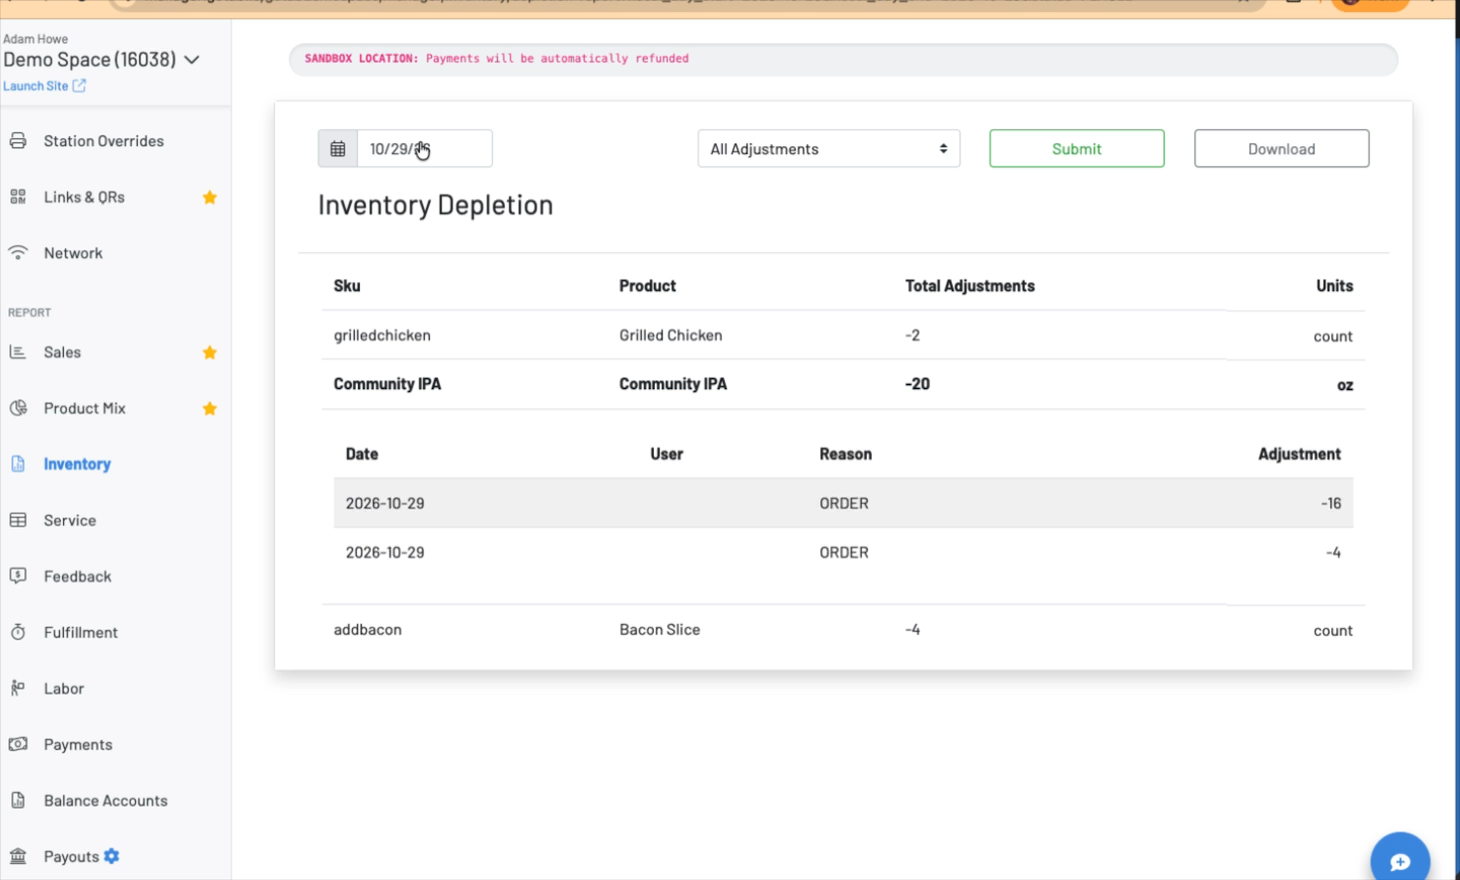
- Each reason (Recount, Received, and any custom reasons) has its own report. Sales appear under All Adjustments with the reason ORDER.
- A reason’s report only has data once that reason has been used in the date range.
- Click an item to see each adjustment with its date, user, reason, and amount. The user is the person who made the adjustment, or the staff member PIN’d in on the POS.
- Use Download to export the report as a spreadsheet.
Product Mix vs. the Inventory report
Section titled “Product Mix vs. the Inventory report”| Use | To see |
|---|---|
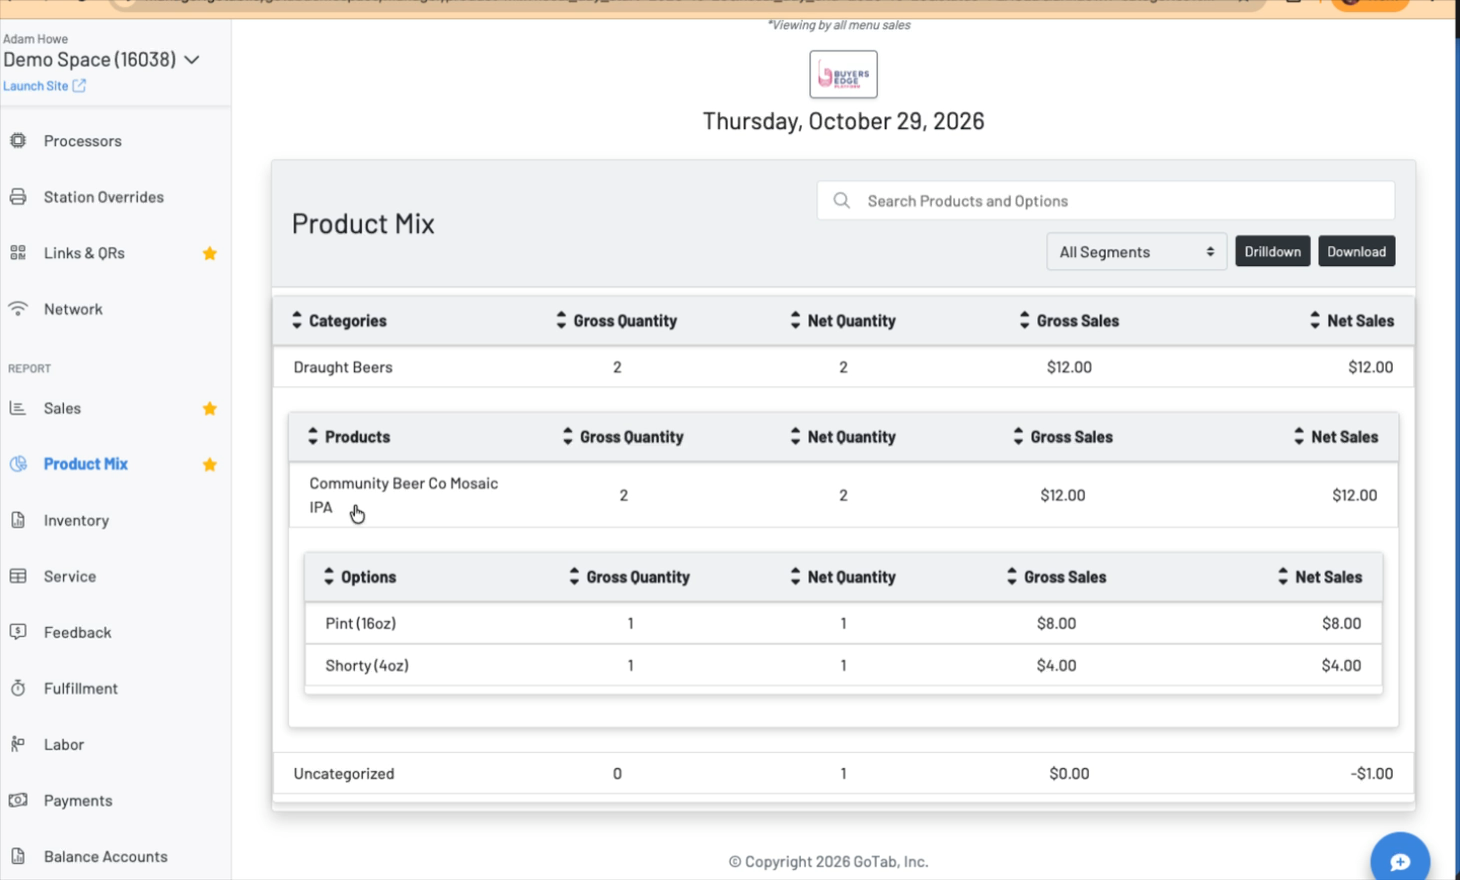
| Product Mix | What sold: quantity and sales by category, product, and option, by zone, fiscal day, and more. It doesn’t show ounces or other units. |
| Inventory report | What was used: how much of each inventory item was depleted or adjusted, in its units, and why. |
For example, Product Mix shows one Pint (16oz) and one Shorty (4oz) sold. The Inventory report shows Community IPA −20 oz.
If your location used Legacy Product Inventory, its Orders, Loss, Theft, and Variant reports no longer appear in the reason list. Create custom reasons (for example Theft) to track those going forward. Older history still appears under All Adjustments.
Kitchen Display: Break Down view
Section titled “Kitchen Display: Break Down view”Where it’s enabled, items with KDS Visibility turned on appear in a Break Down tray on the KDS, next to All-Day and Multi-Items. Break Down shows how many burger patties, fries, or rare temps are needed right now, across every ticket.
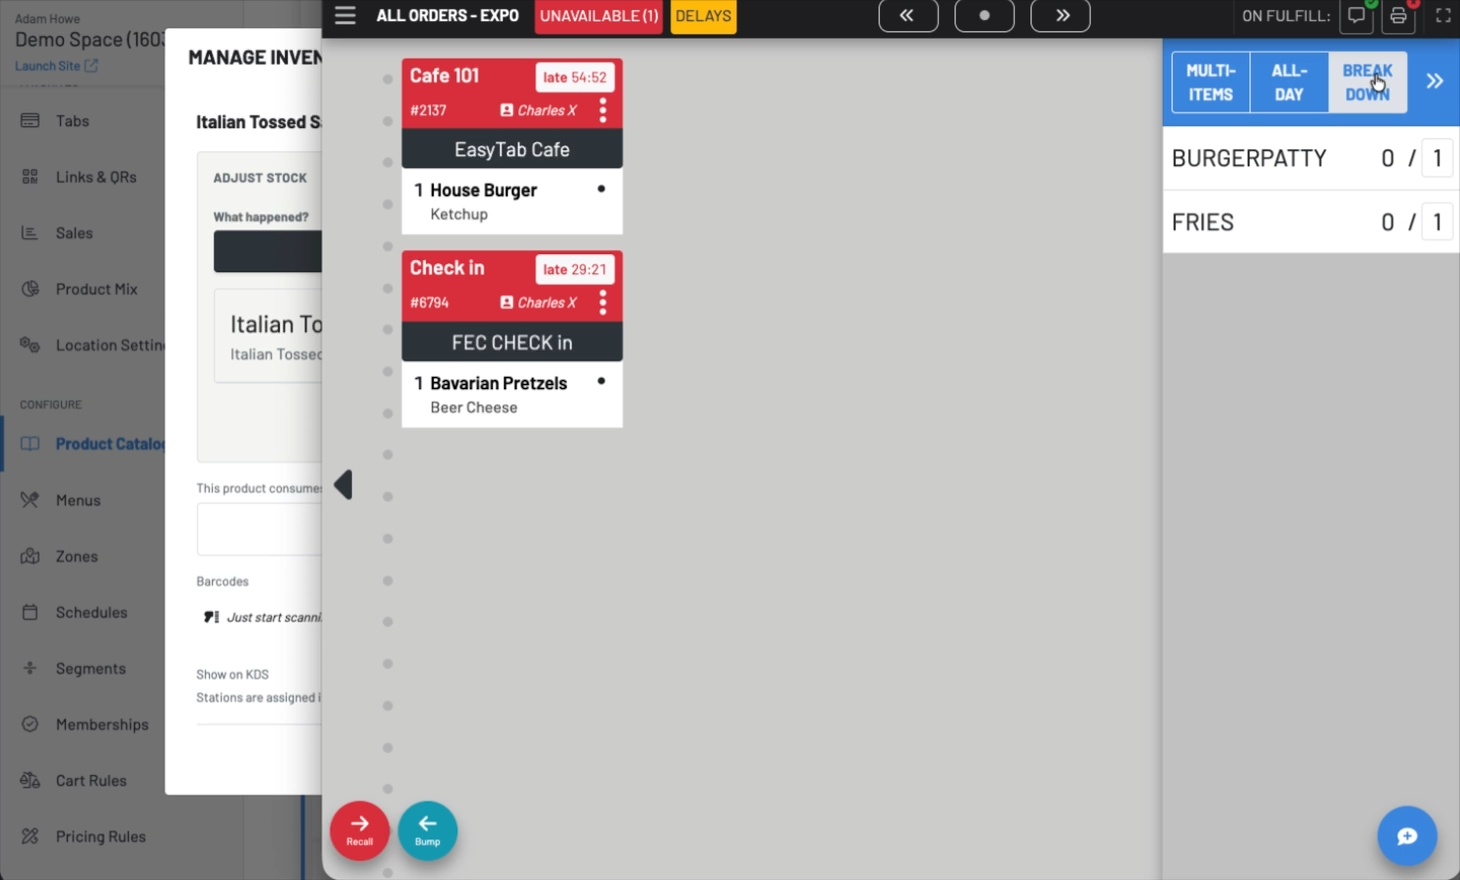
By default, a KDS-visible item shows on the Break Down view of every station its product is sent to. To limit it, open the item on Stock Levels and choose Stations under KDS Visibility. For example, a burger goes to both Fry and Grill, but only Grill cooks the patty, so choose Grill for the burger patty item. Selecting a station the product isn’t routed to has no effect.
Contact your account manager to turn on the Break Down view.
What’s still on the way
Section titled “What’s still on the way”We’re actively expanding Inventory Management. Here’s how a few things work today, and what to do in the meantime:
| Today | What to do for now |
|---|---|
| Out of Stock Action applies after the sale that empties the item. An order larger than what’s left can still go through, and counts can drop below zero. | Keep counts current with a recount at the start of each shift. Mark a product unavailable by hand when you’re down to the last few. |
| Barcodes added to inventory items can’t yet be scanned at the POS or kiosk to ring in a product. | If your team rings items in by barcode, talk to your account manager before setting up those products. |
| The low-count badge on POS buttons (Location Settings → Edit → Display Settings → POS product buttons to show low stock) doesn’t yet appear for products linked to inventory items. | Long-press the product to see how many are available. |
| Par target doesn’t save reliably yet, so the Below par filter may be off. | Track your par levels separately for now. |
| One inventory item per product. | Use option-level items for extra ingredients (see Tracking several ingredients on one product). |
Enhancements for each of these are on the way. This article will be updated as they arrive.
Moving from Legacy Product Inventory
Section titled “Moving from Legacy Product Inventory”We recommend moving to Inventory Management. Legacy Product Inventory will be retired in the future, and new inventory features are built only for Inventory Management. Your account manager switches your location over. For how the legacy system works, see Legacy Product Inventory: managing your stock levels. To prepare:
- Write down your par levels. They don’t carry over and will need to be re-entered.
- Screenshot prices on any products with variants or bulk variants.
- List the products your team rings in by barcode (see What’s still on the way).
- Tell your account manager about any integrations that read or update GoTab stock counts.
Your existing counts, SKUs, and barcodes stay on the items they were on. Your account manager can help rebuild bulk variants, which aren’t used in Inventory Management, as pour-size option groups. After the switch, recount everything and test a few sales.
- Name items for what they are. “House Burger” can link to “Burger Patty”.
- Test with a real sale after linking. The highlight on a product’s Stock Levels icon doesn’t always show every link.
- Refresh the page if a newly created or linked item doesn’t appear in search.
- Scheduled orders deplete when they’re fired, not when they’re placed.