Discounts: How to Create a Discount
Create a discount for all guests to redeem each time they place an order.
Create a discount for all guests to redeem each time they place an order.
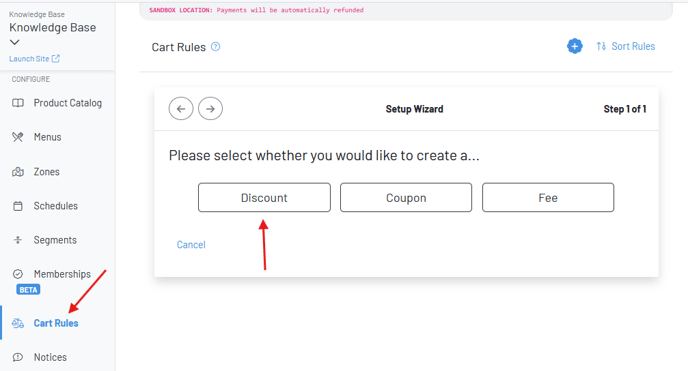
Section titled “Create a discount for all guests to redeem each time they place an order.”- Navigate to your Cart Rules page
- Hit the + to create a discount
-
Select Custom Discount under template selection
-
Step 1 of 12: Name the discount for internal use
-
Step 2 of 12: Name the discount for external use (this is what the customer will see in their cart)
-
Choose if the discount is “Autograt exempt” or “tip exempt”
-
Autograt exempt: Ensures autograt (created in location settings > service fees) is based on the total before discounts.
-
Tip exempt: Ensures tip percentages (tip scale set in zones) is based on the total before discounts.
-
Step 3 of 12: Choose whether you want the discount to apply to the tab (all orders within a tab) or order (each time a new set of products are ordered by the guest or sent on the POS on the tab)
-
Step 4 of 12: Choose if the discount affects a specific product
If the discount affects a specific product(s), add a tag for the product then be sure to tag the product(s) afterwards.
- If the discount affects multiple products, add the same tag to all
Select Create
After creating your discount, you can adjust the time the discount is applied, which can be a great way to set up specific happy hour deals. You can also choose a start and end date for your discount if you’d like it to only be offered for a limited time. 
Discount Entire Order**
- Step 1 & 2: Name the discount (Snow Day Discount, Spring Time Promo, Fourth of July Promo, Flash Sale, On the House Discount, Takeout Discount)
- Step 3: Click “Tab”
- Step 4: Click “No”
- Step 5: Set % or $ amount
- Step 6: Click “No”
- Step 7: You may choose to set a minimum
- Step 8: If the discount is % based, you may choose to set a maximum discount value
- Step 9: Click “No”
- Step 10: You may choose if this discount can be combined with other discounts
- Step 11: You may choose to limit the discount to specific zones
- Step 12: You may choose to limit the discount to specific segments
Refresh the page, toggle on the rule, and TEST!
Discount a Specific Product
- Step 1 & 2: Name the discount (Flight Discount, Chocolate Discount, Wine Discount, etc.)
- Step 3: Click “Tab” or “Order” (order should be used if you’d like to limit the amount of times the discount can be applied to one tab - see step 9)
- Step 4: Click “Yes,” type in or select the tag associated with the product(s) and set the discount quantity to unlimited (only set a quantity to limit the number of products discounted on one Tab, or in the case of a BOGO deal where you buy 1 burger and get 2 fries, for example)
- Step 5: Set % or $ amount
- Step 6: Click “No” (only used for BOGO deals)
- Step 7: You may choose to set a minimum
- Step 8: If the discount is % based, you may choose to set a maximum discount value
- Step 9: You may choose to limit how many times the customer can apply the discount (only set if you choose a specific quantity in step 4). Note: do not set a maximum discount value (step 8) and set this limit
- Step 10: You may choose if this discount can be combined with other discounts
- Step 11: You may choose to limit the “Discount” to specific zones
- Step 12: You may choose to limit the discount to specific segments
Refresh the page and toggle on the rule
- Lastly, in the product catalog, click on the specific product, and add the same tag used in the order rule - move the product to the top of the menu to highlight it
TEST

